I recently put this machine up for sale, but scanned the service manual. Read more →
Category: Electronics Repair
Big Tony’s PokerKard – Model T4 USA – Restoring CloneZilla and dd Drive Images…
You will need: (2) USB Thumb Drives / Keys Narrow and thin or they won’t all fit! (I really like these Kingston drives…) One 2GB or larger One 8GB or larger USB keyboard Big Tony’s PokerKard hardware (properly installed in the Big Tony’s PokerKard cabinet) Proper BIOS Settings for the PC (BIOS settings are below the images) Big Tony’s PokerKard… Read more →
My Adventures with Big Tony’s Pokerkard – Tear down, repair, troubleshooting, etc. (Fixed!)
All of the content on this page is aimed at helping owners troubleshoot, repair, and service their game. If a legitimate request to remove any of the material posted here surfaces, I will honor the request. Recently I picked up a Big Tony’s Pokerkard arcade video/gambling game/machine. It does not boot all the way into the game, but the… Read more →
Wasabi Mango Pixel Perfect UHD420 42″ 4K TV – Details, Experience, & Review (Avoid)
Recently, I decided to purchase a Wasabi-Mango UHD420 42″ 4K monitor on eBay. The specs look great – 60Hz on DisplayPort and a LG IPS panel. Here’s my experience. Packaging: Excellent! Looks Nice! Feet installed: Image is very nice, but the back lighting isn’t quite even throughout. I tried many images, and dynamic back lighting as… Read more →
Samsung LN-832410 TV Repair – BN96-03775A Power Supply Capacitor Replacement…
I actually like repairing electronics and have been doing so with my hobby of restoring classic arcade video games for over 20 years. It is always amusing to me to see that the same problems that plagued an Atari Asteroids machine from 1979 are the same you’ll find in modern power supplies – crappy soldering and/or cheap capacitors.
Interlude over, moving on to the power board in a Samsung TV (LN-832410) – the BN96-03775A. Problem? Cheap caps that swelled up and then “gave up the ghost.”
This particular TV would not power up immediately, but if you left it on for a while, eventually it would fire up and work perfectly.
Ok, so you take something apart – how do you spot a bad or failing capacitor? Usually if the electronic device has failed completely, you will see that the capacitor has become “swollen” on top. This applies for capacitors in anything from TVs to the massive cap that helps kick-start the fans on your outdoor air conditioning units.
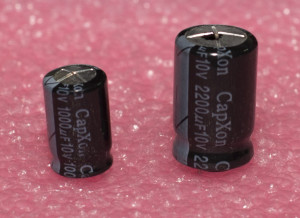
In this Samsung there were 3 caps that showed obvious signs of failure. It may be difficult to see, but if you run your fingers over the top of the caps, it will be really easy to notice which ones feel swollen. Here’s a pic of two of them.
For some electronic devices you can find “cap kits” that let you shot-gun all of the caps on a board. This is a great approach because most of the time the kits are super-cheap ($5 – $15) and why would replace a single 10-year old cap and leave all the other old ones in?
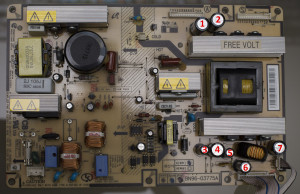
In this case, I replaced (7) capacitors. I labeled them in the photo and their values are listed below the image. Did I mention photography is another of my hobbies?
- 1/2 (CM851 & CM852) = 1500uf 35v
- 3 (CS852) = 1000uf 16v
- 4 (CM856) = 1000uf 25v
- 5 (CM858) = 470uf 25v
- 6 (CM861) = 2200uf 10v
- 7 (CM860) = 1000uf 35v
Total repair minus shipping costs & my time? $7.10.
For most electronic repairs I like to use caps that are rated for around 10,000 hours, 105C+ temp rating, and low ESR. All of the ones I chose for this repair were Panasonic.
I absolutely recommend Mouser for replacement capacitors and electronic parts in general. They have an absolutely massive selection and are in Texas, so I almost always get my parts “next day” regardless of who I ship with. They ship same or next day so regardless of where you live, you’ll get your parts fast.
If you’re looking for cap kits for specific devices, try Google or eBay. If your problem is a common one, odds are someone else has already done the capacitor sourcing for you!
Happy Repairing…Enjoy!


